Documentation
Unity SWF to GAF Converter: Conversion settings
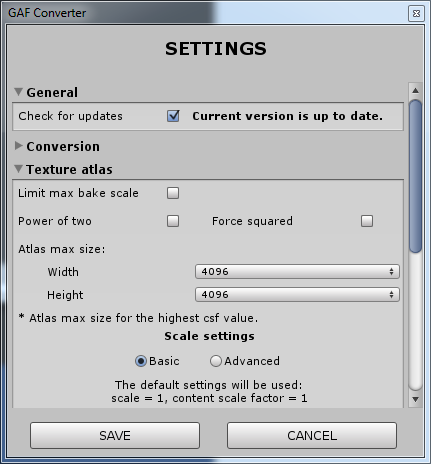
Conversion Settings Dialog contains all settings of the GAF Converter grouped in collapsible panels by purpose. Here you can find the following panels:
General Panel

If this checkbox is selected the GAF: Flash to Unity will automatically check for updates. To disable this option deselect the checkbox.
Conversion Panel
![]()
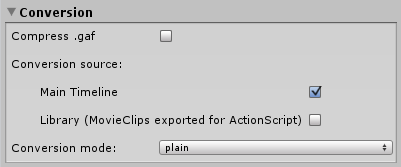
Compress *.gaf files up to 10 times when this option is turned on.
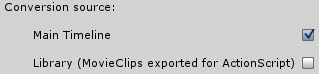
You can use a different type of sources inside SWF that will be used by GAF Converter as a source of the animation to convert. This can be Main Timeline - animation that you see when you open SWF file in the Flash player. Or you can tell GAF Converter to use all Movie Clips that exported for Action Script. In the second case you can create more than one animation inside one SWF file and converted animations will share the same texture atlas. The same result you can achieve by creating animations on Main Timeline in different SWF files and convert them in a bundle. Also, it is possible to use both conversion sources.
![]()
Conversion mode is the program used by GAF Converter to process an SWF animation. There are two conversion modes available: plain and nesting. More information about conversion modes and their key differences read in article Conversion modes “plain” and “nesting”.
Texture Atlas Panel
![]()
Example: you have created some animation with black solid fill background. Your background is let's say 1024x768 px. When you convert your animation you will see that one of the regions in the texture atlas is a black rectangle with dimensions 1024x768 px. But you don't want it to be so big in the atlas. You want to save it in a smaller size in the texture atlas and stretch at playback. This is where the Limit max bake scale will be handy.
Create MovieClip with a small rectangular shape inside, for example, 20x20px. Use it in your animation by placing an instance inside and stretch it to the required dimensions, for example, 1024x768px. Turn on Limit max bake scale checkbox and set value 1 in the field near it. Convert the animation and you will see that this shape will be baked with dimensions 20x20px into the texture atlas. If you turn off this option - shape will be baked with dimensions 1024x768px.
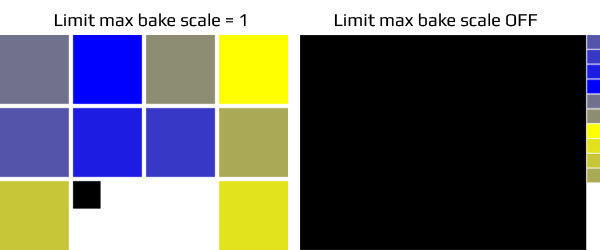
(colored squares are the same size in the original texture atlases)
Please note that Limit max bake scale affects all MovieClips that are used in upscaled dimensions, and you should be careful when using this option.
![]()
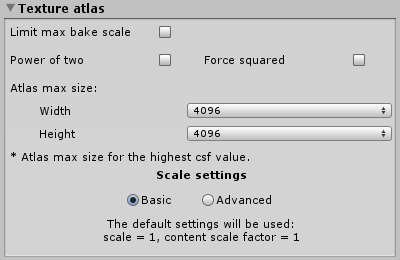
If you want to save atlases with “power of two” dimensions (256x256, 512x512, 1024x1024, etc.) turn this checkbox on. GAF Converter will find the nearest “power of two” dimension that fits the atlas content. Otherwise, GAF Converter will save the atlas with the minimum possible size. All GAF runtime libraries are working fine with non “power of two” atlases.

Here you can choose texture atlas’ max size generated by GAF Converter. If an animation content doesn’t fit in one atlas with the maximum possible size, GAF Converter will generate more atlases. Note: it is better for the playback performance when all animation’s content fits in one atlas. Otherwise much more draw calls will be generated. The maximum possible atlas size is 4096x4096.
Advanced Scale Settings
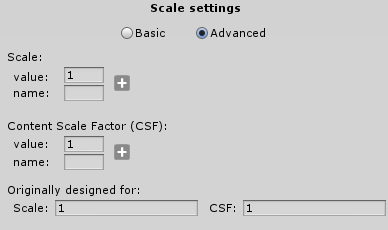
Advanced scale settings allow developers to create texture atlases for the different screen sizes and manage their settings.
Scale value - is a scale factor that will be applied to regions baked into a texture atlas. Used for: increase/decrease size of the converted GAF animation relative to the original SWF animation, or to produce GAF animation in several sizes. Different values produce visually different sizes. Used together with CSF value to manage texture atlas size.
Content Scale Factor (CSF) value - the ratio between screen size in pixels and screen size in points used by the framework. Using this value you can generate texture atlases for screens with different sizes in pixels but same sizes in points used by the framework (for example non-Retina and Retina iPads). Different values produce visually the same sizes (the difference is only in the pixel/point density. Retina - 4 pixel/point, non-Retina - 1 pixel/point). Used together with the Scale value to manage the texture atlas size.
Scale name - is the suffix that will be used for naming the texture atlas file for the specified scale value. Used in conjunction with the Scale value. Formula: SWFFileName_ScaleName_CSFName.png
Content Scale Factor (CSF) name - is the suffix that will be used for naming a texture atlas file for the specified csf value. Used in conjunction with the CSF value. Formula: SWFFileName_ScaleName_CSFName.png
Note: Scale name and CSF name parameters used to control the names of the atlases for different Scale and CSF values. If you don't want to use this feature - leave name fields empty. GAF Converter will generate atlas names automatically.
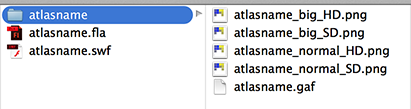
(an example of the conversion result generated by GAF Converter using parameters from the image above)
![]()
The original scale and csf for which the converted SWF animation was designed. Those parameters affect scale and csf calculation in the process of a texture atlas creation.
Example: with Advanced Scale settings you can target the devices with different resolutions on Android, iOS, and other platforms. To do so create an animation for one resolution (Scale: 1 CSF:1) and run GAF Converter with correctly set up Advanced Scale settings (for example Scale=1 and CSF= 1 and 2 for Retina and non-Retina devices).
If you want to create an animation using raster graphics, and you want to use it on both Retina and non-Retina devices you have to do the following:
-
Create your animation in Flash for Retina resolution (for Scale=1 CSF=2). Because you are using raster graphics, you have to create original animation for the highest resolution to avoid pixelation.
-
Setup GAF Converter with the following Advanced Scale settings: Scale=1 CSF=1 and 2
-
Setup "Originally designed for" with the following settings: Scale=1 CSF=2
When the conversion is done, you will see that GAF Converter has created two texture atlases for Retina (Scale=1 CSF=2) and non-Retina (Scale=1 CSF=1) resolutions.
Debug & Optimization Panel
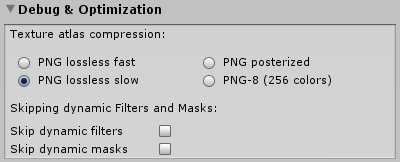
Texture atlas compression. In this section you can select one of the four PNG encoding algorithms that will be applied to texture atlases. Below is a description of each algorithm and example of usage.
![]()
Applies fast PNG lossless compression algorithm. The process is fast, but the atlas size in MB is bigger (up to 120% of the size produced by the "PNG lossless slow" algorithm). Use this option for previewing converted animations before the final conversion. Depending on the number of generated texture atlases and their size, conversion can be faster starting from few seconds and up to a few minutes.
![]()
Applies slow PNG lossless compression algorithm. The process is slow, but the atlas size in MB is smaller (up to 80% of the size produced by the "PNG lossless fast" algorithm). Use this option for the final conversion. Depending on the number of generated texture atlases and their size, conversion can be slower starting from few seconds and up to a few minutes.
![]()
Applies PNG lossy compression algorithm. This algorithm intelligently reduces the number of distinct color/alpha intensities in the image. The final image will look like the image with lossless compression without noticeable changes. The size in MB is smaller (up to 70-80% compared to the size produced by the "PNG lossless slow" algorithm). The result depends on the image. Depending on the number of generated texture atlases and their size, conversion can be slower starting from a few seconds and up to a few minutes.
![]()
Applies PNG lossy compression algorithm. This algorithm reduces the number of distinct colors in the image to 256 colors. Use this option for animations with a limited set of colors (without or with a limited number of gradients). The size in MB is smaller (up to 20-30% compared to the size produced by the "PNG lossless slow" algorithm). The result depends on the image. Depending on the number of generated texture atlases and their size, conversion can be slower starting from a few seconds and up to a few minutes.
Skipping dynamic Filters and Masks. In this section we placed instruments, which allow you to highly optimize GAF animations during conversion. Using those settings you can remove from the animation all the things, that affect performance during a playback. Also, you can use them to debug an animation and to see the effects, that affect performance. Obtained information might be useful for optimizing an animation in Flash Pro before conversion. Below is a description of each setting.
![]() Forces the GAF Converter to skip all filters/effects that are not baked into a texture atlas. With this option turned on, you can be sure that converted animation has no dynamic filters. Dynamic filters affect performance during playback and can dramatically decrease FPS. Please note: a converted animation may look slightly different than the original SWF animation.
Forces the GAF Converter to skip all filters/effects that are not baked into a texture atlas. With this option turned on, you can be sure that converted animation has no dynamic filters. Dynamic filters affect performance during playback and can dramatically decrease FPS. Please note: a converted animation may look slightly different than the original SWF animation.
![]()
Forces the GAF Converter to skip all masks that are not baked into texture atlas. With this option turned on, you can be sure that converted animation has no dynamic masks. Dynamic masks affect performance during playback and can decrease FPS. Please note: a converted animation may look different than the original SWF animation.
Unity Special Panel
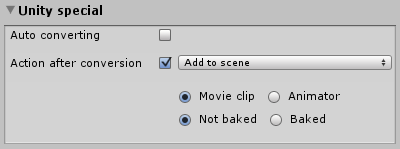
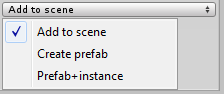 With this dropdown menu you can select the action that will be performed with your converted animation: